System Configuration #
- Installation of java (JDK) –
- Download and install the JDK 11 or above from – Java Downloads | Oracle
- Specify the path to your JDK version in the JAVA_HOME environment variable. To do this, open the Control Panel, search for “environment variables”, in the subsequent dialog, click Environment Variables, and then set the variable value:
- JAVA_HOME C:\Program Files\Java\jdk-11
- Install Nodejs and NPM from – Download | Node.js (nodejs.org)
- Install Appium –
- Run the below command on Command Prompt
npm -g install appium@x.y.z
- Run the below command on Command Prompt
- Install Android Studio from the below link
Android Studio download archives | Android Developers
*Remarks –
- Please accept the terms and condition of Android Studio and download it.
- After Installation Android Studio, Install Android SDK from Configure > SDK Manager and set the path to ‘environments variables’ > ‘System Variables’ as below
- ANDROID_HOME – C:\Users\<User-Name> \AppData\Local\Android\Sdk
- <User-Name> – Please replace this word as per your user’s name
- Note – Please check the ANDROID_HOME is updated or not by Command prompt, the Command is below –
- echo %ANDROID_HOME%
- ANDROID_HOME – C:\Users\<User-Name> \AppData\Local\Android\Sdk
Check If you find the same path as given in environments variable then path is set, otherwise you have to re-start you PC.
- Add some path into your environment’s variables –
- User Variables for <User_Name>
- Click on path, add new path and paste it
%USERPROFILE%\AppData\Local\Android\Sdk\platform-tools
- Click on path, add new path and paste it
- System Variable
- Click on path, add new path and paste it
C:\Program Files\Android\Android Studio\bin
- Click on path, add new path and paste it
- User Variables for <User_Name>
- Setup the appium drivers:
- run the command to install the driver:
“appium driver install uiautomator2”
- Run command to check installed driver:
“appium driver list”
- run the command to install the driver:
Note- Check after running the above command “appium driver list”, If you see this uiautomator2 version then you have successfully installed the driver for execution:
” √ Listing available drivers – uiautomator2@x.y.z [installed (npm)]”
If uiautomator2 is not installed, then run this command to install the uiautomator2
“appium driver install uiautomator2”Mobile Phone Configuration #
- Open Developer Mode –
- Go to your mobile phone setting
- Click on About phone
- Tap 5 times on Build Version until the Developer mode enabled
- Enable USB Debugging and others –
- Go to Developer mode settings
- Enable USB Debugging
- Enable Install via USB [enable if exists]
- Enable USB Debugging (Security settings) [enable if exists]
- Connect to USB and check if it is connected with ADB
- Connect to USB and allow File Transfer/ Android Auto
- And run command –
adb devices 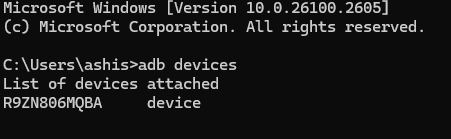
Note:-
- Above id of the device is used as UDID to connect with the same device.
- If adb devices do not appear in the command prompt, please recheck if all the environment variable paths are correctly created or not , if all the paths are correctly created then please restart your system and check the command again.
How to find App_package_name and App_main_activity_name ?
Please connect your device to USB and open the app to find the activity and package name. After doing this, please run a command in Command Prompt.
For Mac/Linux:
adb shell dumpsys window | grep -E 'mCurrentFocus'For Windows:
adb shell dumpsys window | find "mCurrentFocus"How to get UDID ?
Run “adb devices” command in command prompt.
While installing Android studio, which version should be chosen, like standard or custom ?
We can choose any of them but preferences is for standard
Which SDK tools are mandatory to install in Android Studio for automating scripts using SoliteraTA tool ?
These must be installed-
- Android SDK Build-tools
- Android SDK Platform-Tools
- Intel x86 Emulator Accelerator (HAXM installer)
How to Find Elements for Mobile Automation?
To find Elements, perform the below steps -:
1- Download & install the below tools -:
- Appium Desktop Server – Releases · appium/appium-desktop (github.com)
- Appium Inspector –Releases · appium/appium-inspector (github.com)
2- Connect your device/Emulator
3- Open Appium Desktop Sever
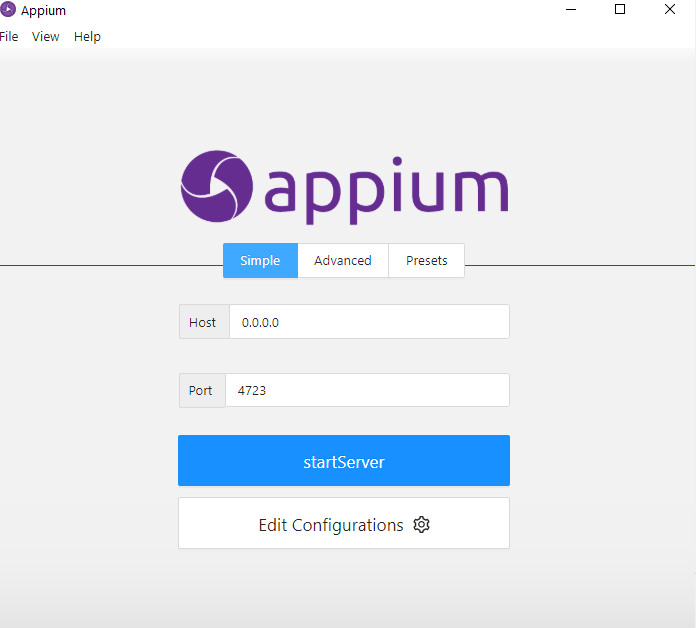
- Go to the advanced tab
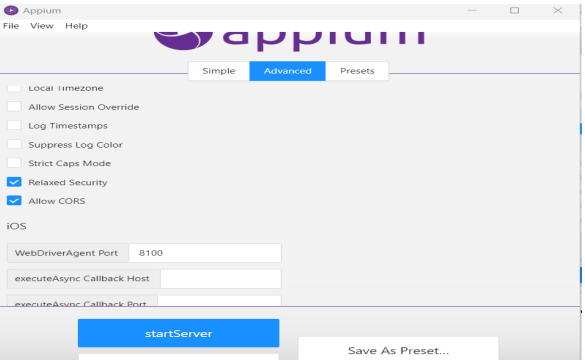
- Here, remove the server address and check the checkbox name Allow CORS
- Start the server, after starting the server started look like the below screen shot.
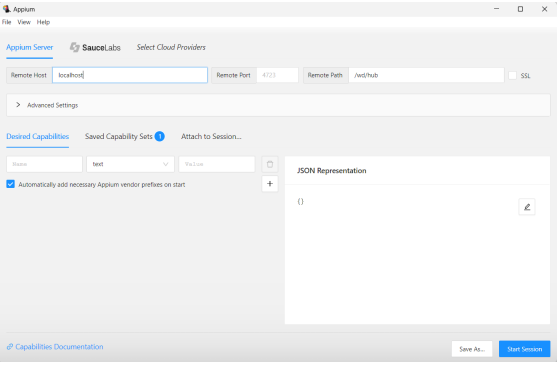
4- Open the Appium Inspector
- Fill the all field as in the above screenshot –
- Remote Host – localhost
- Remote Port – by default 4723
- Remote Path – /wd/hub
- Add Capabilities -: Under the Desired Capabilities add the below fields
| Name | Type | Value |
| platformName | text | Android/ios |
| udid | text | Real / emulator device udid |
| deviceName | text | Name of the device |
| automationName | text | If Android write ‘UiAutomator2’, if IOS write ‘XCUITest’ |
OR
Json Format
{
  "appium:platformName": "Android",
  "appium:udid": "emulator-5554",
  "appium:deviceName": "Pixel_3a",
  "appium:automationName": "UiAutomator2"
}- Open the app, for which you have to create elements
- Now start the session by clicking on Start Session button.
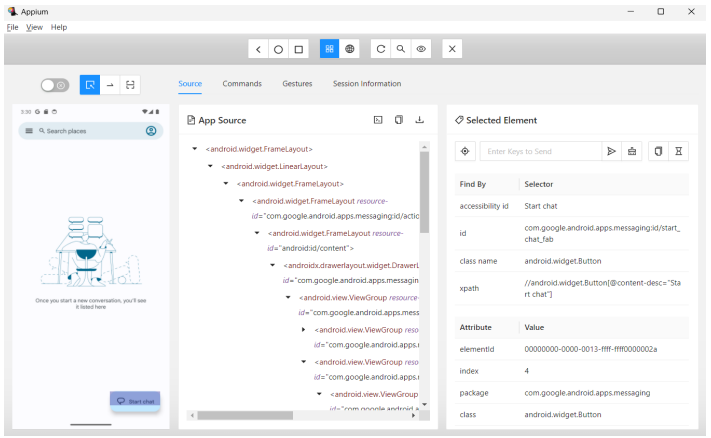
- Once the session started, the Appium Inspector window will open, showing the screen of your connected mobile
- Now use the inspector to select elements on the screen. You can click on any element to view its details, such as the element ID, XPATH, Class name, etc.
- Click on the icon on the left side, for which you want to create an element. For i.e. Start Chat button
- In the above screen shot, we have clicked on Start Chat button, on the right side you can see there are multiple attributes i.e. accessibility id, id, class name, xpath etc.
- Here, copy the value of id attribute and click on the search button on the top, nearby refresh button. Paste the value of the attribute and click on search button
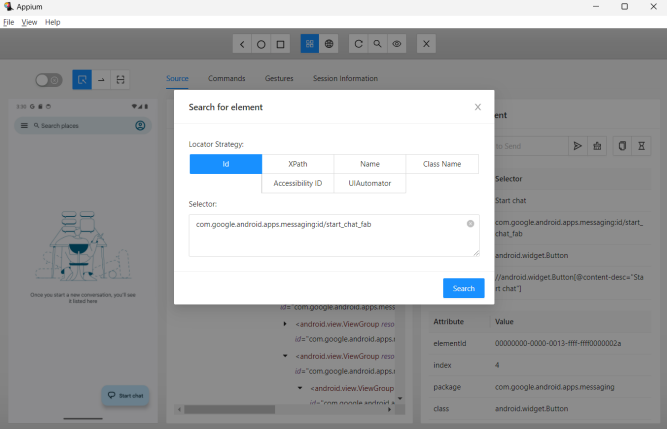
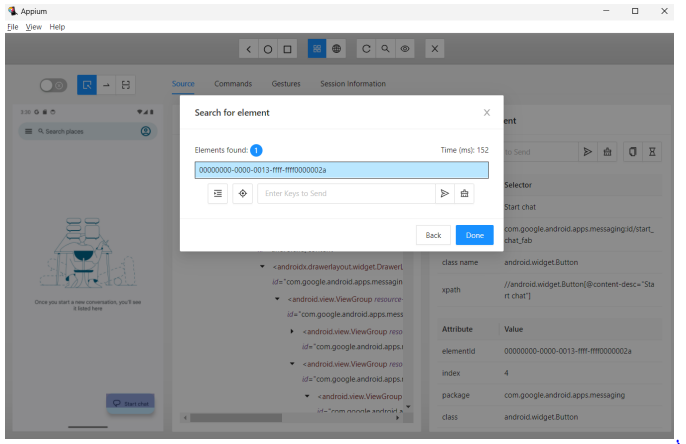
- Now, you can see the element found here we can check if the element is correct or not, by clicking on the found element.
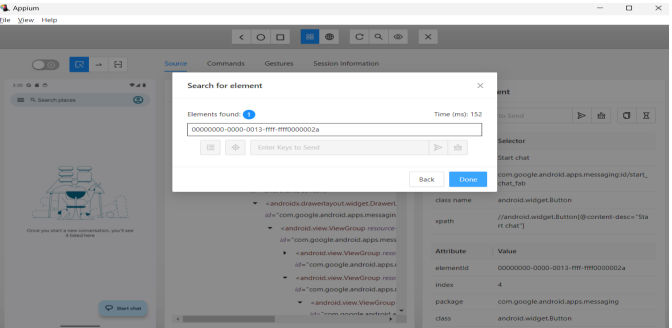
- Here you can see, after clicking on found element, the element is highlighted. So, we have cross checked the element. Now, can copy the value of the id attribute.
Application File Configuration #
Application file format
<environment>
  <config>
    <name>Configuration_Name</name>
    <type>mobile_application</type>
    <platform_name>Android</platform_name>
    <app_installer_path>Apk_File_Location</app_installer_path>
    <app_package_name>App_Package_Name</app_package_name>
    <app_main_activity_name>App_Activity_Name</app_main_activity_name>
    <grant_permissions>true</grant_permissions>
    <reset_app>true</reset_app>
  </config>
</environment>
Last tested and working version of these supported application are-
- appium(version-2.5.4)
- uiautomator2(version- 3.2.0)
- Android studio (Electric Eel | 2022.1.1 Patch 1 January 31, 2023)


